Setting Up a VPN at home is one of those things that sounds terribly complicated but it is not.
Well…Let me rephrase that, setting up a VPN CAN get pretty complicated but with the help of PiVPN, everyone can have a server up and running in just a few minutes.
On this Raspberry Pi VPN tutorial, I will explain you step by step how to setup an OpenVPN Server on a Raspberry Pi.
What are we covering today?
- What is a VPN?
- Types of VPN’s
- Different VPN Protocols.
- Setting Up an OpenVPN Server
- Setting Up Your First VPN Client
Items 1, 2 and 3 are here for informational purposes but they aren’t really required for the setup.
(You can skip them if you are in a rush)
What is a VPN?
VPN stands for Virtual Private Network and it is just that, a secure network which is not restricted to one geographical location, instead, it can communicate buildings in distant corners of the world.
Traditionally, VPNs were mostly used by companies to communicate different buildings by adding a degree of privacy and security. This is the past, VPN’s are now gaining popularity among regular users looking to browse with more privacy and security.
This is not a surprise, the number of transactions with sensitive information (credit cards, tax id, documentation) that we do over the internet has increased significantly over the past few years and we are not going to stop now…Doing stuff from the couch is just too convenient.
The internet is awesome but let’s be frank, there are tons of people out the there with the necessary skills to snoop into your communications while you are buying home automation gadgets connected to a public wifi. This is where a VPN comes into play.
A Virtual Private Network provides you with mainly 2 things:
- Encryption: The data is encrypted when it leaves your device and decrypted once it reaches the destination. This is called the VPN tunnel and it is what keeps your data private and secure. Once you are connected to the VPN, all the internet traffic is routed through this tunnel.
- Authentication: In order to access the VPN, you need to authenticate with user and password.
A few use cases for a VPN could be:
- Access all the devices in your home network from the outside.
- Browse with privacy on unsecured networks.
- Avoid geoblocking for apps like Netflix while you are traveling.
Types of VPN’s
There are primarily two types of VPN’s and although this tutorial only focuses on the first one, I want you to have an idea of both of them.
Remote Access VPN
If you work in the corporate environment and get to work remotely every once in a while, you will be very familiar with this concept.
On a Remote Access VPN, the user (you) configures his device to connect to a remote network and use its services. That is what allows you to connect remotely to your office and use all the tools as if you were there. It is a pretty cool concept.
The main caveat is that this method is not completely transparent to the user since there is some configuration to be done on the client side.
Site-to-Site VPN
A site-to-site VPN also known as router-to-router VPN is more suitable for the corporate environment. The connectivity is established between two networks and the encryption and security are added at the router level rather than the user’s computer.
This is very interesting because a site-to-site VPN can act as a virtual bridge between two buildings that are geographically apart.
This allows companies to communicate privately through the Internet.
Different VPN Protocols
Regardless of the VPN type that you use, the communication can leverage different protocols or a combination of them. I am not going to cover all of them, but I will mention 3 popular ones.
- Point – to – Point Tunneling Protocol (PPTP): PPTP has been around for the longest time and it is supported for all the major OS’s out there. It is widely extended but its security has been called to question in the past few years. It is very fast because it uses very basic encryption, however, it is not recommended from a security standpoint.
- L2TP/IPSec: L2TP was the result of a partnership between Cisco and Microsoft in an intent to create a more secure version of PPTP. It uses IPSec to implement the End-to-End encryption during the communication.
- OpenVPN is an Open Source Product created back in 2001 that is becoming a standard. It is based on OpenSSL and it is considered one of the most secure options when it comes to VPN communication. OpenVPN is supported by all the major OS’s and it is easy to implement. it is one of the best options for a domestic VPN like ours.
Our Raspberry Pi VPN will be be using a Remote Access OpenVPN.
If you want to dig deeper into the VPN world check these resources:
Types of VPN’s and VPN Protocols
Raspberry Pi VPN: Setup an OpenVPN Server
For this tutorial, I assume that you already have a Raspberry Pi with a Linux distribution installed, preferably Raspbian or any of its derivatives.
PiVPN is optimized for Raspberry Pi but it should run fine in most of the Linux distributions.
Download and Install Required Packages
Let’s start by downloading the PiVPN Script.
It is available for you to go through it but once you execute the following command it will kick off.
SSH into your Raspberry Pi and run the following command.
|
1 |
curl -L https://install.pivpn.io | bash |
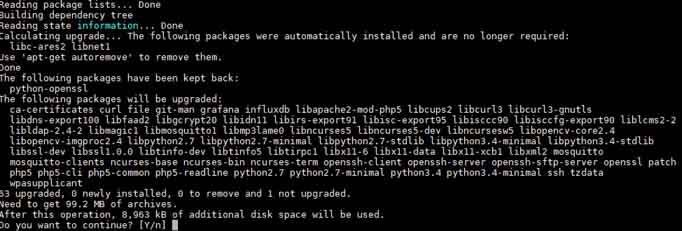
Once it is downloaded, PiVPN will look for updates in the system and start installing the required packages.
If the installation process shows that there are pending updates, you should consider updating the system once the process is finished.
I will add a step for this at the end of the tutorial.
The download will be done in no time and soon after it will ask you for your password. This is required to install the new packages.
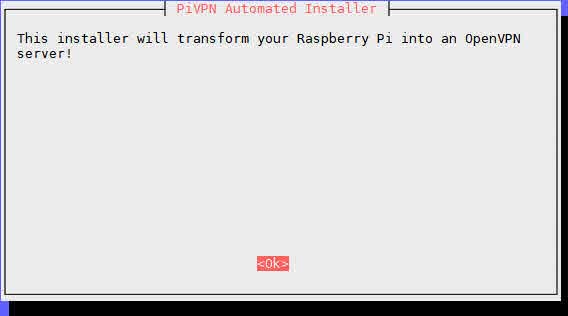
The installation process for the Raspberry Pi VPN shouldn’t take more than a couple of minutes but it depends on your internet connection and version of Raspberry Pi. When you see this message on the screen you are ready to proceed.
Hit enter to start with the installation.
Assign Static IP Address
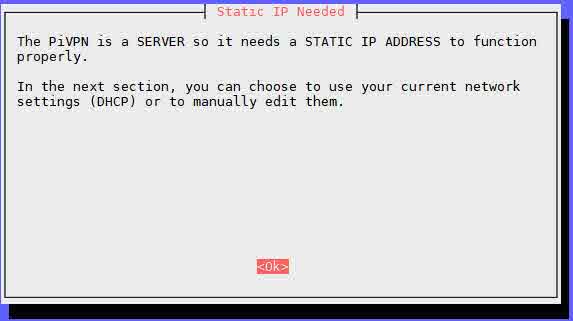
The VPN server requires a static IP to function correctly but don’t worry if you haven’t set up one yet , PiVPN will do that for you.
As you probably know, your router assigns IPs to the different devices connected to the network. When you restart your router, the IP’s assigned to the different devices can change which is the reason to assign a static ip in this case.
Your clients need to know where to find you.
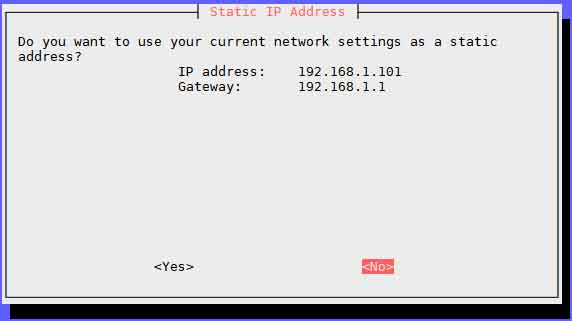
You can leave the IP that is currently assigned to your Raspberry Pi. I am going to click on No because I want to assign a different one.

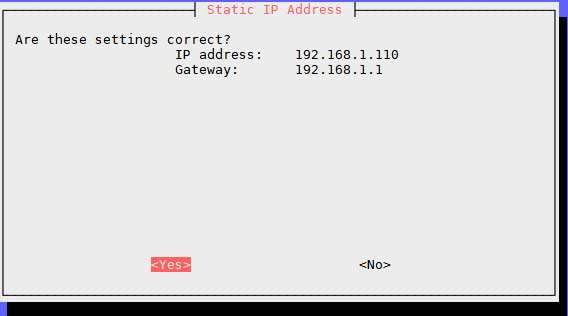
Once you have assigned an IP that you like to your Raspberry Pi, you are ready to move on to the next step.
Select your Default Gateway
The default gateway is the device your Raspberry Pi connects to the Internet through, your router in most cases.
The script should be able to find it automatically but you may want to verify that the IP shown in the screen does indeed correspond to your router’s IP.
It will usually be http://192.168.1.1 or http://192.168.0.1
One of those should take you to your router configuration page.
Verify that all the settings look correct and let’s keep rolling.
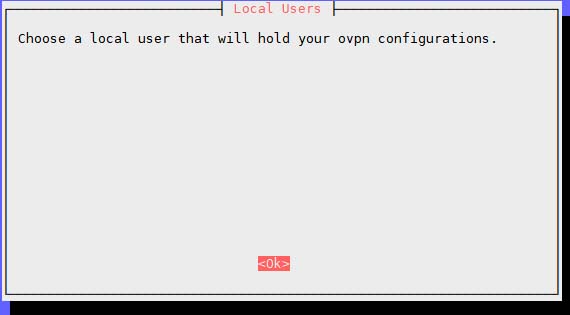
User That Will Hold OVPN Configurations
This step is not terribly relevant, you just need to specify a user that is going to hold the ovpn configuration for your Raspberry Pi VPN.
When you create new client profiles, the files will be generated on this user’s home directory.
Don’t worry too much about this now, we will get to this step late in the tutorial.
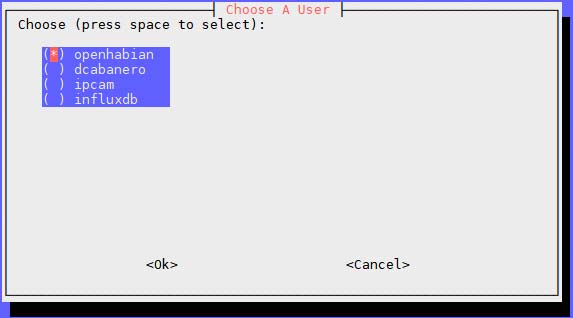
You will be prompted with a list of users to chose from. I am going to select the service account for my openHAB server but it doesn’t make much of a difference provided that you can login with that user account.
Be careful here, when you hit enter, it will take you directly to the next screen and if you made a mistake you will have to start over.
Not fun!
Unattended Upgrades
Having a Raspberry Pi VPN means that one of the external ports of your router will have to exposed to the internet.
There are some security concerns with that and you want to make sure that you have all the fixes and updates related to security.
This step enables unattended-upgrades to keep you up to date, I would suggest you do it for your own peace of mind.
TCP vs UDP – What is This?
Now you have to choose between TCP and UDP as the communication protocol for OpenVPN. The recommended approach here is UDP and the reason is speed.
TCP it is what is called a stateful protocol. This means that every time it sends a package it waits for confirmation.
This feature although very reliable slows down the communication.
UDP, on the other hand, is a stateless protocol, it sends the information without waiting for a response. This protocol is suitable for the majority of the applications of a VPN and it will boost your performance.
Choosing an OpenVPN Port
This is the port that will wait for external connections, choose whichever you like, just make sure it is over 1024.
Confirm the settings and move forward.
Select the Encryption Level
This is for the number of bits used in the encryption process. The higher the number the more secure it is.
Let’s pick 4096-bit you might be thinking.
While it is totally fine to do so, it will slow down the key generation and the processing itself. 2048-bit is more than enough IMHO and it will give you a nice performance.
Confirm and go for it.
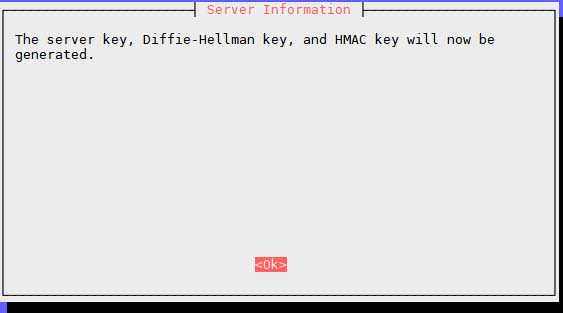
The key generation is the longest part of the process, it takes quite a while but you don’t have to actively do anything so go get yourself a drink and read some other post in the blog.
Public IP or DNS
Once the key generation process is done, the script will prompt you to chose a public IP or a dynamic DNS.
The whole point of having a VPN is to access your network from the outside. The only issue is that most ISP’s assign different IP’s when you restart your router.
For this reason, it is best to pick a Dynamic DNS like DuckDNS. There are several options but I use DuckDNS myself, it is free and blazing fast.
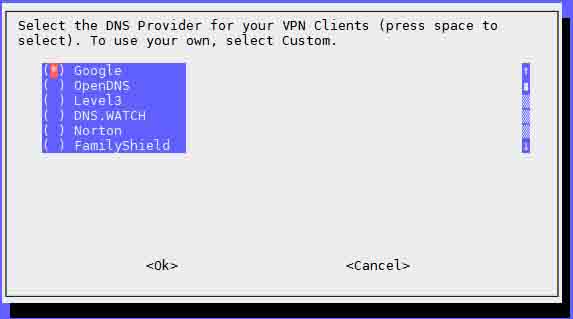
Select a DNS Provider
You need to use a DNS provider to handle your requests. Be aware that the DNS provider will be able to see all your requests. I am fine with that, so I have selected Google.
The Raspberry Pi VPN Installation is Complete!
That’s it! Your Raspberry Pi VPN Server is ready to be used.
You will now be prompted to reboot your Raspberry Pi which I think you should while you get another drink.
Update the OS
Don’t forget to update the system after your Raspberry Pi is back up.
|
1 |
sudo apt-get upgrade |
This may take a few minutes depending on how far behind are you.
Raspberry Pi VPN: Setup your First Client
Now that your Raspberry Pi VPN server is up and running it is time to set up your first client.
Creating the OVPN File
The ovpn file contains the private key and the details to connect to the server. It is a necessary requirement for your clients to connect to the VPN.
You can generate as many as you want and ideally you will want to create one per user. In this way, you can revoke the access for some users if you need to.
In order to generate the ovpn file you will use the magic command:
|
1 |
pivpn add |
The add function will ask you for a client name and a password. The client name can be whatever you want, just make sure that you remember the password that you have used. Your client will need it to connect to the Raspberry Pi VPN.
The ovpn file is generated and PiVPN is showing you the location where you can find it.
Port Forwarding
To be able to connect to the VPN server from outside of your network, you will need to do port forwarding to the IP and port that you have configured during the installation process.
Unfortunately, I can’t help you with that because every router is different but it should be a simple process.
Connecting to the VPN Server Using a Windows Client
In order to connect to the VPN server, you will need an OpenVPN client installed on your computer, there are many options but I personally use the one provided by OpenVPN.
Just head to the OpenVPN website and download it for free:
Once it is downloaded go ahead with the installation. You can go with the default options, it just takes a couple of minutes.
Once you have the client installed you will need to bring over to your computer the ovpn file that PiVPN created . I am using OpenHABIAN so the directory is already mounted:
\\OPENHABIANPI\openhabian\ovpns
If you don’t have that, you can use an FTP client like Filezilla to copy the file.
Open the OpenVPN client to import the configuration.

Once the configuration is imported, hit connect to open a connection to the VPN server.
And voila! after typing the password you should be connected to your very own Raspberry Pi VPN server.
Start browsing with privacy!
I hope you enjoy it, share the post if you think that other people may like it.












Nice tutorial ! (and useful)
Thanks man! Have you implemented?
Yes. Some time ago. With dnsdynamic and ddclient.
But I just saw that dnsdynamic is out of bussines so I think I will try duckdns !
But I have a problem : local hostnames won’t resolve over OpenVPN, I have to use the IP adress
Hey, that is correct. OpenVPN doesn’t resolve to internal host so you would need to define an static IP. Is that an issue on your side?
Hi David,
for the step with port forwarding to my router I am having issues:
As far as I can see in my router I have to add a “virtual server”
But it asks be beside from the LAN IP adress, and the LAN Port a-lrto for WAN Port (and protocol).
I have used UDP in the configuration.
Is the WAN Port now 1194, or is there some duckdns-specific?
Hi Edizius,
You can use the internal ip your RPI uses and 1194 (unless you changed it) for both internal and external ports.
Hi, thanks for the fast reply.
If it was changed, external stays at 1194, and internal changes to the configurated one?
Or do then both change?
Because somehow it is not working. I am not able to establish a connection, although i sticked to your tutorial…. So I assume there is something wrong in the step for “port forwarding”…
Can you connect locally to the VPN using the dyn DNS?
Have you checked that the DNS resolves to your current external IP?
Does your router have a firewall?
sorry, I am quite new to this, and do not really understand how to check these steps.
I can not connect to “myaccount.duckdns.org”, and I can not even ping it, if that is the dyn DNS.
On duck DNS page although is written “success: domain myaccount.duckdns.org added to your account”.
If I check my routers IP with “https://whatismyipaddress.com/” the IP matches the IP shown in duckdns.
Firewall I have only on PC side, not on router side…
looks like there is by default some firewall etc. installed, because I can not ping the adress of my router (which is shown on “https://whatismyipaddress.com/”).
So thanks, there is at least a hint where to start search from…
Hi there,
Can you email me, private don’t paste it here.
External IP and duckdns domain?
I will have a look when I get home.
HOW TO CONNECT SITE TO SITE USING THIS
Hi All,
I did the setup of pivpn, but not able to understand how to do port forwarding. my router is KPN experia box v9.
Please give example atleast to do port forwarding.
I have installed even the OPENCLIENT, which is getting failed in connecting…
Please let know.
Regards
Vaidyanath
Hi vaidyanath,
I am afraid I can´t help with that one since I don´t have that unit myself. I hope one of the readers has one and can help!
Hi HAB,
I will try to enrich it as soon as I have som time.
Hello I’m having issues connecting using ovpn.
Pinging the server using the ddns domain as adress works, inside and outide of my local network, i followed the instructions to install the auto ip updater of duckdns and it works…
I tried setting my router’s firewall to minimum but no luck, ovpn keep failing to connect
Hi Jeremy,
Does it work using the IP directly?
Thanks.
Hi HAB,
I set up RPi as instructed and everything works. I was wondering what needs to be done in order for me to see shared folders?
Thank you in advance.
Marko
Hi Marko,
You shouldn’t have to do much, when you go to Network the OPENHABIANPI should show up as one of the Pcs.
You don’t see it?
I notice now it is using WireGuard. Should I choose this ?
Cheers.
P.s great blog. I’m such a Newb
Hi Raphael,
Yes, you can use WireGuard now.
Thanks for the comment!
Hi, PiVPN is great, but is it easy to set up somewhere so that the ovpn file requires a user and password? By default, the ovpn file requires only a password.
Thanks.
Hi David, got my new raspberry pi 4 but I am stuck at the start gate, I have internet connected however when I enter “curl -L https://install.pivpn.io | bash” I get the following Xfered average speed upload 0, average Speed download 0 0curl: (7) Couldn’t connect to server
BTW have you used PIVPN-GUI? I have installed it on dietpi and I don’t see how to authenticate myself. Reject user root and dietpi. Thanks
Hi Raul,
I have never tried the GUI but I recently transitioned into WireGuard which is also very well supported. Have you tried it?
Thanks!
Hi Bob,
I recently trancition to Wireguard which you can install directly with openhabian. Have you tried?
Thanks!
HI Ondra,
I will see what I can find.