We recently got the new Shelly 2.5 dual-relay module to test it and the results are actually impressive. It is easily the most versatile device that we have tested lately and specially catered for tinkerers due to its ability to swap firmware and connect to Open Source Home automation systems using MQTT out of the box.
This will be a very in-depth review so have a look to the topics that will be covered in case you are in a pinch and want to go straight to the point.
- What is Shelly 2.5?
- Shelly 2.5: Pros and Cons
- Interfacing with the Shelly 2.5
- Technical Specifications
- Shelly 2.5 Mobile App: Introduction to the Settings.
- Web Interface Vs Mobile App
- Shelly 2.5: Wrap-Up
What is The Shelly 2.5?
The Shelly 2.5 is a wifi device that can be used to control electrical circuits with its two internal relays. It can be used as a two-channel relay with individually controlled outputs or as roller shutter controller.
Both relays have also power measurement capability. It has two inputs for local switches/pushbuttons so that you can use it also without the app by installing switches or push buttons to its inputs.
It is very small (39 x 36 x 17mm) so it can be installed in a box behind your wall switch and you can connect the existing switch/Push button to it. This is great, becuase it allows you to turn virtually any old fashion switch into a smart one that can be remotely operated or manually.
Here you can have a look into the different configuration diagrams of the device.


Shelly 2.5: Pros and Cons
Shelly 2.5: Pros
- Extremely versatile device able to turn pretty much any device into a smart one.
- It can measure power consumption and execute different actions based on it.
- Outstanding safety measures to prevent electrical fires.
- Endless third-party integrations.
- Constantly updated with new features.
- Very small footprint. It can fit anywhere.
Shelly 2.5: Cons
- It is not a plug and play kind of device. You will need to be handy with electricity to be able to install it.
- It uses wifi. If you scale up the number of devices at home you might need a better router.
Interfacing with the Shelly 2.5
Out of the box, the shelly 2.5 can be remotely controlled through the following channels:
- Smartphone App – Android, IOS.
- Web Client using your Internet Browser.
- Voice Assistants – Amazon Echo, Google Home
- REST-API for Developers.
The SmartPhone App controls the devices from the Shelly cloud, so as long as you can connect to the internet you will be able to control the devices.
Not exactly out of the box, however, with some small adjustments, the devices can also be used with MQTT-protocol and CoAP-based protocol(CoIoT).
If all these options aren’t enough for you, the Shelly 2.5 comes with a programming/debug header so that you can flash alternative firmware to it.
Technical Specifications
Let’s first have a look at the technical specifications of the device…
Voltage: 110-230V ±10% 50/60Hz AC or 24-60V DC.
Max. relay current: 10A
Working temperature: – 40°C to 40°C
Wifi frequency: 2400 – 2500 MHz
Range: 50m outdoors and 30m indoors
If you look at the technical specs, you will see an important number, which is the max current. The Relays can stand 10A current each. This means that if you are using a voltage of 230VAC , the max power per channel is 2300W, while with 110VAC it is 1100W and with 24VDC it is 240W. You need to keep this in mind to make sure that the device you are connecting, doesn’t exceed max power specified in this section.
The relays on the Shelly 2.5 aren’t potential free like in Shelly 1, so they output the same voltage that is used to supply the device itself.
For example, if you supply the Shelly 2.5 with 230VAC, the relays will output 230VAC as well. The SW1- and SW2- switch inputs work the same way, so that inputs use the same voltage that is used to supply Shelly 2.5.
If you see the connection diagrams at the beginning of the post, you will notice that there are two L-connectors. These are internally connected to each other so they are always at the same ”potential”(Voltage, phase).
This means, for example, that when using AC-voltage you can’t connect one phase to other L-connector and second phase to other L-connector, and so both of the L-connectors have to be behind the same phase and voltage.
One point to be noticed is that, unlike many other multi-voltage devices, when using Shelly with 24VDC-60VDC the plus(+)-wire is to be connected to N-connector and minus(-)-wire to L connector. This becomes clearer checking the diagram.
Shelly 2.5 has a temperature sensor to prevent overheating. If the temperature goes too high, the device shuts down automatically. It also has overpowered protection and, even though not advertised, it detects earth leakage also. If the difference in current between L and N is more than 10mA it automatically shuts down.
I am not aware of any other device that implements all of those safety features, which makes the Shelly 2.5 one of the safest options to make your devices smarter.
Shelly 2.5 Installation
I don’t have IOS-devices so all the details shown below, are based on the Android OS.
The first step is to download the Shelly App using the Google Play or Apple Store, depending on which device you fancy. You can use the QR-codes below to find the apps.

After you have downloaded and installed the app, you should start by adding a room to your settings. You can do it by tapping the three lines in the upper right corner and then clicking on ”Add Room”. I have tested this few times already, so part of the setup is already done on my side.
A room is just a way to classify your devices within the app.


After that, you will be asked to give the room a name and picture. For room picture, you can use the 2 different built-in pictures or you can upload your own image.
After you are done, tap ”Save room”. You are now ready to start adding devices so go ahead and click ”Add devices”.


The Shelly App will now take you to a screen that shows your discovered devices. As you haven’t searched any new devices yet, that page doesn’t show any so you should tap ”Search for new devices”.
After that, the app will take you through the process of configuring the wifi settings which is the last step before searching for the devices.


When using an android device, the inclusion mode should automatically detect the Access Point that Shelly 2.5 creates, and add it automatically.
In my experience, there was one time when the app didn’t detect the new Shelly 2.5 automatically, so I started a new inclusion search and, instead of my home wifi network, I chose the Access Point that the new Shelly 2.5 created. The app eventually found the devices and included it.
According to Shelly 2.5 manual, this is also the way to add new devices to Shelly, when using IOS-device.
If the inclusion was successful, you should see the following screen that informs you that a new device was found.

Tap the ”Discovered Devices” and you should see a newly added device. Now you can Tap ”Click to add” and the Shelly 2.5 app will take you through the process of adding the new device. Once you are ready you can click ”Save device”.
At the end of the process, the UI will ask you if you want to connect the device to the cloud. This is up to you, but keep in mind that it is a requirement to control the device remotely using the SmartPhone App.


If you chose to connect it to the cloud and all goes well, you will see a page that displays that the device is preparing status. This may take a while so be patient.
After a while, you see ”0W” and ”Local” texts in addition to the power button on the right side of both channels. This informs your new device is ready to use.
Most likely, you will also see little orange tiles with arrows on the left side of the channels. This tells you that there are updates available for the device. Make sure you download the latest upgrades.


You should also see a window popping up that states ”New firmware available”. Tap ”Update all” and let it update the firmware. After some time, the app informs you that the update was successful.
Your device is now ready to be used. Press the power buttons to test and you should hear relays clicking inside the Shelly 2.5.


Shelly 2.5: Introduction to the Settings
This section is a rundown of all the settings available on the Shelly 2.5 and it is very detailed. It would make more sense to read it after you have the device in your hands.
I’m going to go through mobile app settings first and then at the end, I will show what you can do with web interface but not with the mobile app currently.
From the screen where both channels are shown, you can open first settings. Tap the three lines on the upper right corner and after that tap the edit icon (pencil).
You’ll see a yellow tile that allows you to edit the channel and a red tile that you can use to delete the channel.


The “Edit device” screen allows you to edit some basic details on the channel like the name, the room and the type of channel itself (light or outlet).
There isn’t so much of a difference from a technical perspective between light or outlet but it does matter when you refer to the objects from a voice assistant like Alexa or Google Home.

Next, we are going to the settings found under the channel. Tap the first (or second) channel and you will see the next screen.

From this screen, you can control the relay with the power button and see the ”Total”-energy consumption and current power consumption.
This screen also offers you a series of features that I will describe in this section.
Timer
The timer can be configured for the relay to turn ON or OFF after a certain amount of seconds.
It seems that both timers can’t be used at the same time. I managed to enable and set times for both timers in the app, but in reality, the relay only obeys the other. This is most likely made on purpose so that you can’t make an infinite loop of relay changing state.

Weekly schedule
The weekly schedule can set the relay to turn ON or OFF based on a weekly and daily schedule.
If you tap the ”Time” box you can also find ”Sunrise” and ”Sunset” options. This is a pretty cool functionality to build automation based on the time of the day. It will keep in mind your actual geographic position.


Internet/Security
Let’s move on to the next section, Internet/Security. Here you can configure some basic network and security Features.

Wifi-mode – client
Here you can set which wifi Shelly 2.5 should be connected, and set a static IP.
Setting a static IP is always a good idea when speaking about devices that are fixed in a certain position. For example, if you want to connect to your shelly through the web interface you need to know the IP of the device.
Also If you wish to, for example, to control other Shelly’s through the URL:s found under ”Actions” (We will get to this later), you have to know the IP of this device.
When setting Static IP you should always consider setting the static IP’s outside the routers DHCP-area. For example, you could set your routers DHCP-area to 192.168.0.2 – 192.168.0.49, and get the static IP’s from the area 192.168.0.50 – 192.168.0.99. In this way, your router can never give the same IP-address to any other device, as your Static IP devices are outside its DHCP-range.
In order to set the static IP you need:
- The IP address itself. You can use whatever you like to use, but it has to be in the same address space than other devices. For example, IP addresses that begin with 192.168.0.
- Set network mask to the same one the other devices in your home network use.
- IP-address of the gateway. (The routers IP address)
- DNS. This is optional.
After you have set all of these details, you can press ”Connect”. If everything goes fine your device can be found from the IP you set on the step 1.
If things don’t go well and you can’t connect to your Shelly device anymore, here is what you can do to get it back working:
- Remove the device from the Shelly app and set it to AP-mode. You can set the device to AP-mode by pressing the reset button for 10 seconds. Another way to to do this is by pressing the button/switch connected to SW1 or SW2 for 5 times in 1 minute, right after the device has powered up.
- Run the inclusion again.
Wifi client backup
This allows you to configure a backup wifi in case the main one goes down or disappears for some reason.
If you use the static IP, I would recommend setting the backup wifi static IP settings the same as the main wifi static IP settings. By doing this, your device can still operate the same way as earlier.
This is a pretty neat functionality that can make your Home Automation setup more stable.
Wifi mode – access point
This section configures the Shelly as an access point so that you can connect to it.
Restrict login
In order to protect the access through the web interface, it is always a good idea to set up a user and a password and this section allows you to do so.
Cloud
Here you can connect/disconnect the shelly to/from the cloud. If the device is not connected to the cloud, it can’t be controlled outside your own network, unless you configure the port forwarding in your router.
Also if you are using MQTT to control you shelly 2.5, you can’t connect it to the cloud.
Safety
One of the highlights of the Shelly 2.5 is the array of safety features that it comes with. One of these features is the overload protection
This setting lets you set desired max power protection. It means that if the set power gets exceeded, Shelly 2.5 automatically turns the relay off.
Excellent for the overload protection of electrical devices or protecting the relay itself.

As I already mentioned at the beginning of this article, Shelly relay can work with up to 10A current. If you decide to use the max power protection to protect the relay, remember it is dependant of the voltage you are using to supply the device.
For example, when using 230VAC, max power protection should be max 2300W but when using 24VDC it should be 240W.
Even though Shelly relay can stand 10A current, it is generally better to load the circuit so that the maximum current is never reached. Usually, electrical stuff work better when they are not loaded 100% of their capabilities all the time. I usually prefer to stick to 80% of the device’s capabilities, so in Shelly 2.5 this would mean 8A constant current.
In a real-life for example, when using Shelly 2.5 behind a wall switch, the load is much less than even 8A, as lighting is usually grouped into smaller circuits.
Electrical circuits should be also protected with at least Circuit breakers. When using voltages from 110VAC-230VAC you should use residual current circuit breaker in addition to basic circuit breaker. Voltages from 110VAC to 230VAC can be life-threatening, and even if you are using smaller voltages they can cause fire in short-circuit situation.
If you are not qualified to work with 110-230VAC, hire an electrician to do the installations. This way the installation becomes legal, and it is made right from the beginning.
Actions
Other than triggering the mechanical relays inside of the device, the Shelly 2.5 can also kick off other devices that can be controlled using a URL. The action can be triggered based on different events.

If you want to dig deeper on this topic you should check the following post in the Facebook support group.
Settings
The Shelly 2.5 has a ton of options which can make the settings a bit complex but it is the price to pay if you want a device that does it all.

Power-On default mode
The default mode drives what happens when Shelly is powered back for example after a power outage.
It can act in four different ways: relay turns ON, relay turns OFF, restores the last state, and Switch.
The first three options are pretty self-explanatory but in the Switch Mode, the relay operates according to local switch(SW1 or SW2) that is connected to it.
Button type
Local switch/button (SW1 and SW2) can be set to work in 5 different modes: Momentary, Toggle, Edge, Detached and activation switch.
The following diagrams will explain the different modes in a graphical way. Two-headed arrows show the moment when the button is pressed and relay state changes. 1 means ON-state and 0 means OFF state.
Momentary: This can be used together with, for example, spring return button(impulse). State of the relay changes always, when the button is pressed(Rising edge):

Toggle: This should be used when you have a flip switch, i.e. basic light switch with two different positions. When it is set this way, the switch always turns relay the ON in a certain position and OFF in the other position.

Edge: Use this when you have a flip switch and you always want to change relay state when the switch is flipped:

Detached: This separates the manual switch from the relay so when the switch/button is pressed it doesn’t change the state of the relay at all. However, when you hit the switch, it still registers the interaction on the MQTT-topic of the switch.
Using this configuration, SW1 and SW2 can be used as ”Digital inputs” to for example transmit ON/OFF type of sensors state to your home automation system.
So basically when Shelly 2.5 is set this way, the device has two inputs and two outputs, which can be used as needed:

Activation switch: If SW1 state changes, relay always turns ON. No matter what happens at SW1 input, the relay stays ON until it is turned OFF by different means, a timer or motion sensor perhaps.

Mode
The Shelly 2.5 can operate in two modes:
- Relay: Using this mode, the device is meant to turn ON or OFF different devices.
- Roller shutter: It can be used to control different kinds of roller shutters (doors, windows, …). Supports command UP, DOWN and STOP.
Firmware update
Very self-explanatory, here you can upgrade the firmware of the device.
Time zone and GEO-location
This section allows you to toggle between automated detection of the timezone or manual.
Factory reset
This option brings your Shelly 2.5 back to the original configuration when you opened the box. Please keep in mind that you will lose all the configurations including the wifi and the cloud details.
Device information
Here you can find all the information about the device, this becomes very relevant if you use MQTT integration since the device id is part of the topic.
Groups and scenes
This feature allows you to group functionalities that can be triggered together.
Groups
Using Groups you can group different devices together and control them all at the same time. You could, for example, group all the lights at home into one group and then turn them all ON or OFF with one push button. It seems that currently you can only group devices that have similar functionality.
Scenes
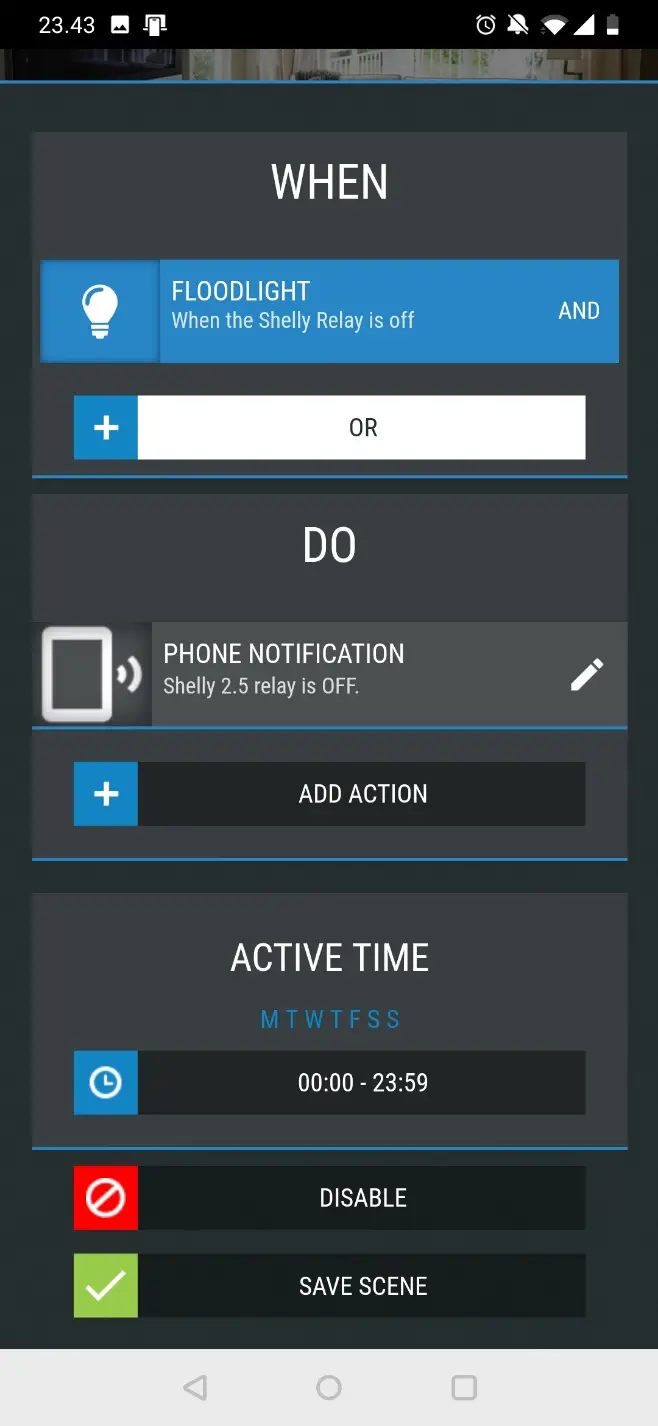
Scenes are a sort of automation set in the form of trigger + action.
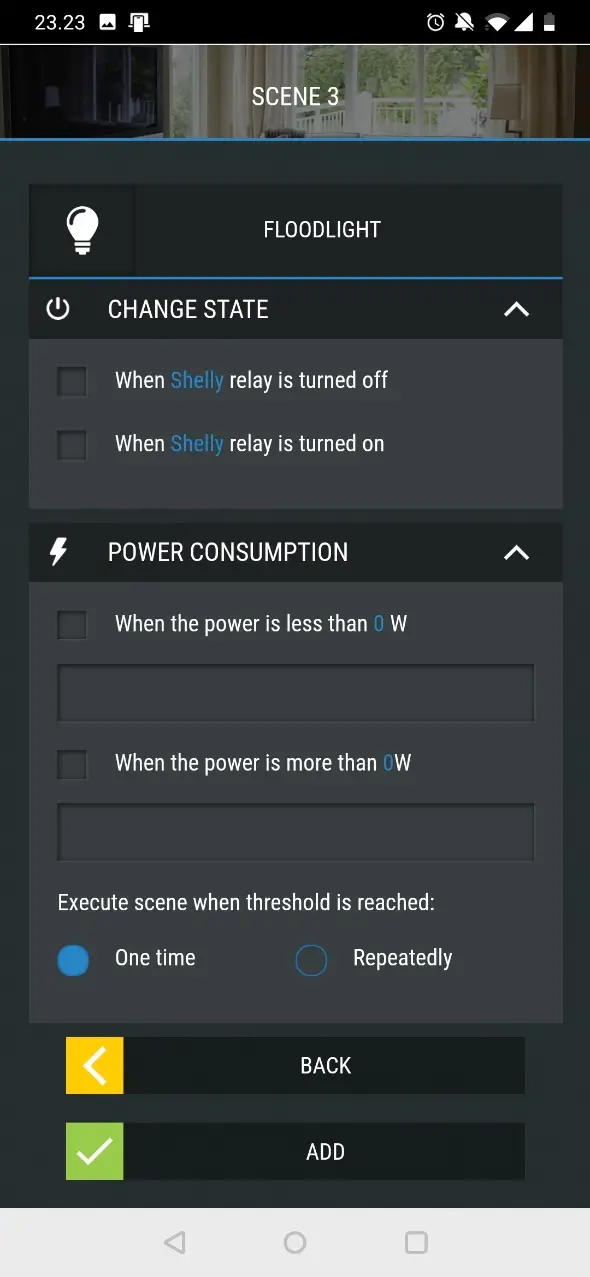
The ”When” condition can be time-based (Timer, Daily activation, one-time activation) or device-based. As we are using Shelly 2.5 the device based triggers are, ”when relay is turned OFF”, ”when relay is turned ON”, ”When the power is less than” and ”When the power is more than”.
For these power level conditions, you can also set if the scene is executed only one time or repeatedly.
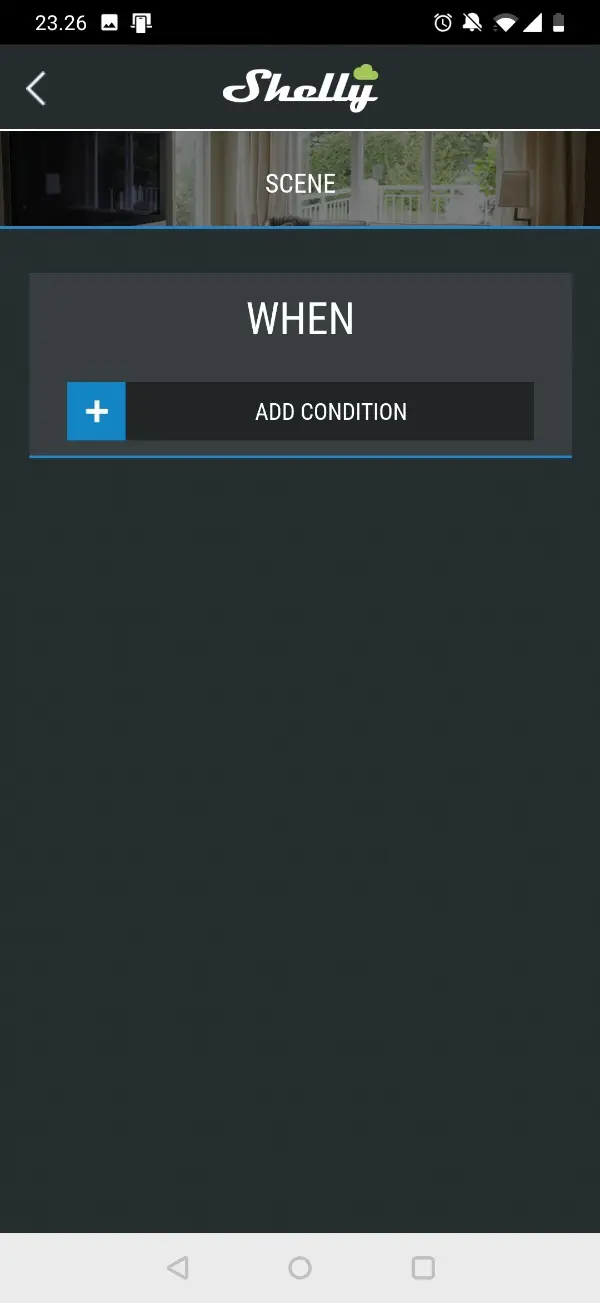
You can also add several ”When”-conditions.
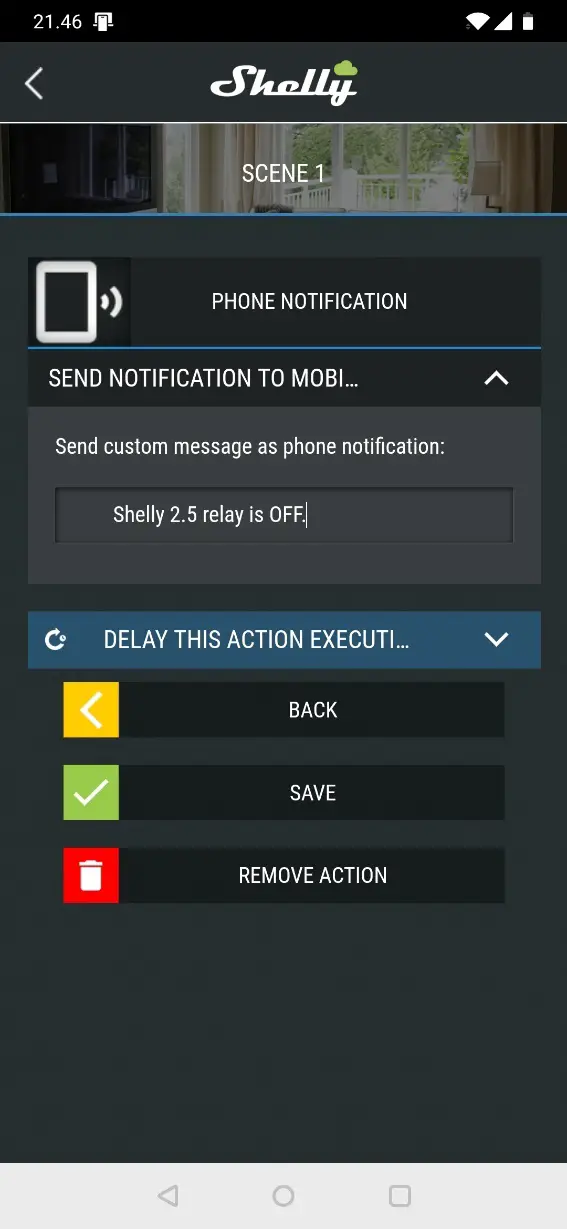
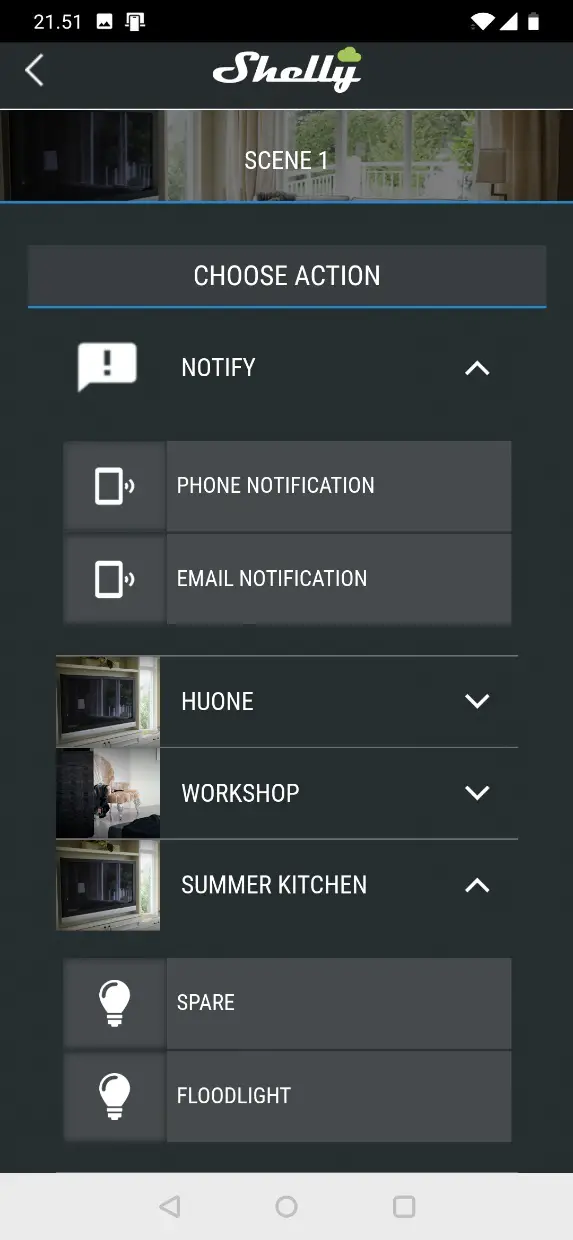
After ”When”-condition is set, you set the ”DO”-action(or several of them). When using Shelly 2.5, for ”DO”-actions you can set its relays to turn ON or OFF, or make the app send a custom notification message through the app or by email.
After setting When conditions and Do actions you can set ”Active time”. This means the time period when the scene is enabled to execute. You are able to choose which weekdays, start and end time the action will remain active.
When you are happy with the results hit save and test them.

Web Interface Vs Mobile App
There are a few differences between the mobile app and web interface for the shelly devices.
The Shelly app includes all of your Shelly devices and their settings, however, through the web interface, you can only control the device that you connect to. This means that the web interface obviously has only the settings needed to control the connected device.
The web interface can be accessed by checking the IP of the device from ”Device information” and writing it in the browser address bar: http://<shellysip>.

The web interface follows the aesthetics of the Mobile App but it has a few additional options.
SNTP-Server:
Set up an SNTP-server to keep the time in sync. The default one is ”time.google.com”
Advanced – developer settings
– Here you can enable action execution via CoAP(CoIOT)protocol and MQTT-protocol.

I have no experience about CoAP-protocol, but you can find its documentation from this link.
MQTT:
When you enable the MQTT-protocol you should see this screen.

Here you can set the username, password, IP and port of your MQTT-broker(Server-field), min- and max-reconnect time, keep-alive time, clean session, retain, Max QoS, last will topic and last will message.
I have tested it with Openhab and Mosquitto-broker for which I only had to change the MQTT broker IP. I don’t use username and password since my server is only accessible locally.
Keep in mind that if you want to use MQTT with shelly 2.5, currently it needs to be disconnected from the cloud. So you can’t control it remotely anymore and you can’t view it consumption history. If you are using a Home Automation Platform like openHAB this is not necessarily an issue since all these functionalities can be implemented there.
It also seems that when you connect locally to your wifi, MQTT-enabled Shelly 2.5 can’t always be controlled from the mobile app, or at least it takes a long time for the device to become accessible. I hope it is only a software-based problem which can be dealt with firmware upgrades.
You can find additional documentation to about the MQTT Configuration on this link.
Shelly 2.5: Wrap-Up
So…what are the final thoughts on the Shelly 2.5 device…
- Shelly 2.5 is an extremely versatile device. You can use it on its own, but it also integrates well with other devices thanks to third-party integrations like REST-api, MQTT, CoAP, Alexa and Google Assistant.
- The price is very competitive especially considering that it can replace Smart Switches that tend to be more expensive. There is no need to break the bank if you decide to enhance every light at home with a Shelly 2.5 module.
- As I said before, these devices run on wifi so at some point it can outgrow your router capacity. If you want to solve this problem, you can always when an additional router to extend the network or upgrade your current one. This will also improve your wifi coverage which is always a good thing.
- One of the most important things is that these devices get firmware updates constantly and they are getting new features all the time. It really seems that they are trying to make all Shelly devices as versatile as possible.
- The safety features are outstanding and pretty unique.
- It is great for tinkerers.
In my opinion, the Shelly 2.5 might be the most versatile dual-channel wifi relay that there is currently in the smart home market and definitely worth the investment.
Vesa Laine


Nice post.
Main Part wich i am missing is the capability of using tasmota as weil as a comparisson to a sonoff dual / sonoff t1 2 Gang (with tasmota).
Thanks for the post, finally I understood how it works.
I have used several Shelly 2.5 and Shelly Dimmer 2 in my house to automate the light. One solution for using one Shelly 2.5 for two light circuits with different L that I successfully use is to drive with one Shelly 2.5 channel a small relay that also fits behind the second switch. This way the second circuit is witched by the Shelly but the potential free relay takes care of the electrical separation. The relais I used is the Relay Flush mount Finder 13.31.8.230.4300 which is nearly as small as the Shelly and nicely fits into the outlet next to it..
Thanks for putting this together! Successfully installed (09/01/20) and configured my Shelly EM w/ two 120A CTs (120 VAC L1 and 120 VAC L2) and this was most informative.